|
|
|
|
|
|
|
|
|
|
|
|
|
|
|
|
|
|
|
|
|
|
|
|
| Enjoying a simple computing experience is just a few steps away |


 |
Download FreeISOBurner
Open FreeISOBurner.exe |
 |
Press Open
Browse for justbrowsing_YYYYMMDD.iso Select Optical Drive |
|
 |
Insert blank CD±R, DVD±R, or DVD-RW
Press Burn |
 |
 |
Reboot/Restart the computer |
 |
Some computers: hold down key (varies) during boot to access boot menu
Common hotkeys are F8, F12, TAB, C, Right-Click |
 |
Select CD-ROM to boot |
OR | |
|
All computers: hold down key (varies) during boot to enter BIOS setup Common hotkeys are ESC, F1, F2, F8, F10, F11, F12, DEL |
|
Change Boot order/priority to CD-ROM 1st (top of the list) using on-screen instructions Save and exit |
 |
SYSLINUX boot menu
Select entry with ↑ ↓ and Enter |
 |
 |
Splash screen |  |
|
Windows 8 Note: click top left corner to access Desktop
Open Downloads folder |
|
|
Right-click on justbrowsing_YYYYMMDD.iso file
Select Burn disc image |
 |
|
Insert blank CD±R, DVD±R, or DVD-RW
Press Burn |
 |
|
Reboot/Restart the computer |
|
Windows 8 Note: newer computers come with UEFI and "Secure Boot" may cause problems
Some computers: hold down key (varies) during boot to access boot menu Common hotkeys are F8, F12, TAB, C, Right-Click |
|
Select CD-ROM to boot |
OR | |
|
All computers: hold down key (varies) during boot to enter BIOS setup Common hotkeys are ESC, F1, F2, F8, F10, F11, F12, DEL |
|
Change Boot order/priority to CD-ROM 1st (top of the list) using on-screen instructions Save and exit |
|
SYSLINUX boot menu
Select entry with ↑ ↓ and Enter |
|
|
Splash screen | |
|
Open Downloads folder | |
|
Right-click on justbrowsing_YYYYMMDD.iso file
Select Write to Disc... |
 |
|
Insert blank CD±R, DVD±R, or DVD-RW
Press Burn |
 |
|
Reboot/Restart the computer |
|
Some computers: hold down key (varies) during boot to access boot menu
Common hotkeys are F8, F12, TAB, C, Right-Click |
|
Select CD-ROM to boot |
OR | |
|
All computers: hold down key (varies) during boot to enter BIOS setup Common hotkeys are ESC, F1, F2, F8, F10, F11, F12, DEL |
|
Change Boot order/priority to CD-ROM 1st (top of the list) using on-screen instructions Save and exit |
|
SYSLINUX boot menu
Select entry with ↑ ↓ and Enter |
|
|
Splash screen | |
|
Open K3B program | |
|
Select Burn Image
Open justbrowsing_YYYYMMDD.iso in Downloads folder |
|
|
Insert blank CD±R, DVD±R, or DVD-RW
Press Start |
 |
|
Reboot/Restart the computer |
|
Some computers: hold down key (varies) during boot to access boot menu
Common hotkeys are F8, F12, TAB, C, Right-Click |
|
Select CD-ROM to boot |
OR | |
|
All computers: hold down key (varies) during boot to enter BIOS setup Common hotkeys are ESC, F1, F2, F8, F10, F11, F12, DEL |
|
Change Boot order/priority to CD-ROM 1st (top of the list) using on-screen instructions Save and exit |
|
SYSLINUX boot menu
Select entry with ↑ ↓ and Enter |
|
|
Splash screen | |
|
Hold C or option during boot |
|
SYSLINUX boot menu
Select entry with ↑ ↓ and Enter |
|
|
Splash screen | |

|
Download Win32 Disk Imager
Right-click win32diskimager.zip, Extract All Open extracted folder, double-click Win32DiskImager.exe |
 |
|
Browse for justbrowsing_YYYYMMDD.iso Select USB Device Press Write |

WARNING: This will DELETE ALL CONTENTS of selected drive |
|
Reboot/Restart the computer |
|
Some computers: hold down key (varies) during boot to access boot menu
Common hotkeys are F8, F12, TAB, C, Right-Click |
|
Select USB to boot |
OR | |
|
All computers: hold down key (varies) during boot to enter BIOS setup Common hotkeys are ESC, F1, F2, F8, F10, F11, F12, DEL |
|
Change Boot order/priority to USB 1st (top of the list) using on-screen instructions Save and exit |
|
SYSLINUX boot menu
Select entry with ↑ ↓ and Enter |
|
|
Splash screen | |
|
|
|
Download helper script
Select a USB drive at least 1 GB in capacity. |
|
Open UNetbootin Select DiskImage Browse for justbrowsing_YYYYMMDD.iso Select Drive Press OK |

WARNING: This will DELETE ALL CONTENTS of selected drive |
|
Reboot/Restart the computer |
|
Some computers: hold down key (varies) during boot to access boot menu
Common hotkeys are F8, F12, TAB, C, Right-Click |
|
Select USB to boot |
OR | |
|
All computers: hold down key (varies) during boot to enter BIOS setup Common hotkeys are ESC, F1, F2, F8, F10, F11, F12, DEL |
|
Change Boot order/priority to USB 1st (top of the list) using on-screen instructions Save and exit |
|
SYSLINUX boot menu
Select entry with ↑ ↓ and Enter |
|
|
Splash screen | |
|
|
|
Download helper script
Select a USB drive at least 1 GB in capacity. |
||||||||||||||||||||||||||||||||||||||
|
WARNING: This will DELETE ALL CONTENTS of selected drive
|
||||||||||||||||||||||||||||||||||||||
|
Reboot/Restart the computer |
|
Some computers: hold down key (varies) during boot to access boot menu
Common hotkeys are F8, F12, TAB, C, Right-Click |
|
Select USB to boot |
OR | |
|
All computers: hold down key (varies) during boot to enter BIOS setup Common hotkeys are ESC, F1, F2, F8, F10, F11, F12, DEL |
|
Change Boot order/priority to USB 1st (top of the list) using on-screen instructions Save and exit |
|
SYSLINUX boot menu
Select entry with ↑ ↓ and Enter |
|
|
Splash screen | |
|
|


|
Download the ArchLinux .iso file | ||
|
Burn to a CD/DVD/USB | ||
|
Download the JustBrowsing .iso file | ||
|
Copy justbrowsing_YYYYMMDD.iso file to USB thumbdrive | ||
|
Boot ArchLinux LiveCD/USB | ||
|
Follow one of the following tutorials:
|
||
OR | |||
|
Experimental install wizard (live or persist installer):
|
 |
|
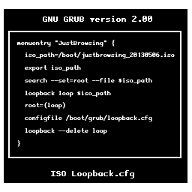
Copy .iso file to /boot partition |
|
Add the following boot entry to /boot/grub/grub.cfg |


|
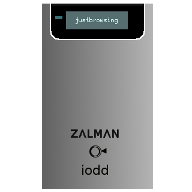
Plug in device in HDD mode
Copy .iso to _ISO folder |
|
Safely remove device
Reboot/Restart the computer |
|
Plug in device in ISO/ODD mode
Select justbrowsing_YYYYMMDD.iso from the list |
| Download README |


|
Run commands |
| |
|
Choose Boot JustBrowsing (VMware)
Select entry with ↑ ↓ Edit entry with TAB and set vmware=1366x768 to desired resolution Press Enter to boot |
 |
|
|
Splash screen
(note: bootsplash not displayed with VMware driver) |
|
| QEMU_AUDIO_DRV=alsa | environmental variable to enable audio |
| qemu-system-x86_64 | QEMU executable |
| -enable-kvm | enable KVM |
| -m 2000 | set RAM to 2GB |
| -machine type=pc,accel=kvm | force KVM |
| -cpu host | match emulated CPU to host system |
| -vga vmware | set GPU hardware to vmware driver |
| -soundhw ac97 | set audio hardware to AC97 |
| -cdrom justbrowsing_YYYYMMDD.iso | set ISO to boot |
|
Download OVA file | ||
OR | |||
|
Convert ISO to OVA |
|
|
|
Open Downloads folder
Double-click OVA file |
 |
|
|
Note: may need to run modprobe vboxdrv
Press Import |
 |
|
|
Press Start
Choose Boot JustBrowsing (VMware) Select entry with ↑ ↓ and Enter (note: use QEMU or VMware for resolution greater than 1024x768) |
|
|
|
Splash screen | |
|
Note: may need to run modprobe vboxdrv
Open VirtualBox Press New |
 |
|
Set name (Just Browsing), type (Linux), version (Arch Linux)
Set RAM to allocate (not more than half host system's RAM) Select Do not add a virtual hard drive Press Continue on the warning |
 |
|
Press Settings
Select Storage Empty CD/DVD drive Browse for justbrowsing_YYYYMMDD.iso Check the Live CD/DVD box |

|
|
Press Start
Choose Boot JustBrowsing (VMware) Select entry with ↑ ↓ and Enter (note: use QEMU or VMware for resolution greater than 1024x768) |
|
|
Splash screen | |
|
|
|
|